Wednesday, May 29, 2013


 After visiting my local Radio Shack and Staples without finding the USB sound adapter or USB microphone that would work with the Pi, I decided to check one of the local box stores. After searching through their computer accessories for awhile I happened upon this Logitech C110 webcam with microphone, which reminded me of a blog post I was reading about voice control, here. After a few Google searches on my smartphone, I discovered that someone else had already used this same webcam and was able to stream audio from it successfully (here). At a purchase price of $19, this was cheaper than most standalone USB microphones, so I decided to go with the C110 webcam to act as my microphone. Maybe I'll add gesture-control to the Pi-amp later on!


Here is a close up view of the camera.


I also picked up a 3' audio cable for the audio out on the Pi.


And I figured I'd probably need these zip ties for the cable routing once I move everything to the vehicle.


Stay tuned - I'll be getting the microphone set up soon!


Sunday, May 26, 2013

Obstacles; time to take a step back

The lap-dock turned out to take up a bit more of the view in my front windshield than I was comfortable with, so I've decided to modify my project slightly. I'm going to be getting the Pi set up to operate headless and be completely voice controlled. I spent the majority of the day attempting to get my Pi to recognize my Turtle Beach bluetooth earpiece (to no avail). Setting up bluetooth to work on the Pi is much more difficult than I had anticipated. I may look at getting a simple USB microphone that I can mount somewhere in the vehicle instead.


These obstacles that I seem to be running into have made me realize that my project planning needs a bit more.... well, planning. To that end, I've decided to come up with an official project plan:


Project Summary

The goal of "pi-amp" is to create a headless (no video display) jukebox for the vehicle which is controlled entirely through voice. Pi-amp will log in automatically after boot, after which it will play a sound file to the stereo and begin listening for voice commands. The vehicle operator will then be able to search for either artist, song title, or album name using a simple command structure.

Pi-amp will play a sound to confirm that the command was recognized. If more than one match is found, Pi-amp will inform the operator. The operator may then either say "filter <criteria>" to include only those files which match <criteria>, or say "list choices" to tell Pi-amp to read off the choices. Pi-amp will number the choices as it reads them for easy selection. The operator may say "cancel" at any time to tell Pi-amp to stop any action it is currently performing. After choices are read, the operater may say "select <number>" to indicate to Pi-amp which file should be played.

Timeline

Week 1 (May 6-12):

Successfully boot Raspberry Pi.

Week 2 (May 13-19):

Acquire all hardware necessary for headless in-vehicle operation.

Week 3 (May 20-26):

Successfully record an audio file using an attached microphone.

Week 4 (May 27-June 2):

Install Julius continuous speech decoder OR pocketsphinx.

Week 5 (June 3-9):

Able to play audio files from attached USB hard drive using python script.

Week 6 (June 10-16):

Script to search sound files completed.

Week 7 (June 17-23):

Speech control scripts finalized and pi-amp installed and working in vehicle.

Scope

Hardware Requirements:

  • Raspberry Pi
  • Powered USB Hub
  • USB Microphone
  • USB Hard Drive
  • 150 Watt 3-Outlet Power Inverter with USB
  • 5V 1.2A DC to USB charging adapter with two USB ports

Software Requirements:

  • Debian "Wheezy"
  • Julius large vocabulary continuous speech recognition decoder OR pocketsphinx


I've already completed the milestones for weeks 1 and 2, but I've yet to complete the milestone for week 3 (successfully record from microphone). As a result, I'm going to have to work a bit of over time in week 4 to finish up week 3's milestone in addition to week 4's. It should be a busy week!


Saturday, May 18, 2013

Project components arrive, one minor disappointment:


Motorola Bionic Lapdock

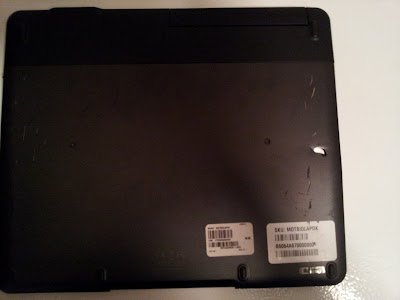
I received my Motorola Bionic Lapdock today, and I was greeted by a small disappointment, which you can see pictured below. There are numerous gouges on the bottom of the lapdock, as well as one major puncture mark (shiny silver spot mid-right). I haven't received all of my adapter cables to hook the Pi up to the lapdock yet, so I can't test the functionality of the screen, but I was able to confirm that the lapdock's battery is charging while plugged into the wall.


On the bright side, the top of the lapdock looks much better, and it fits almost perfectly in the dash compartment of my Ford Fusion that I was planning to use as a mounting platform for the lapdock. All I need to do is remove the compartment cover, and then I will be able to open the lapdock's screen fully. The lapdock will also sit about 1.5 inches further back without the compartment cover in place, so it won't be hanging over the vents like it is in the pictures below.


Raspberry Pi!


I also received my Raspberry Pi! The Pi's tiny size is simply incredible when you see it first-hand. The pictures really don't do it justice! I promptly took a trip to town to get an SD card in order to get a test environment up and running on the Pi.


After loading the Raspbian "Wheezy" image onto my newly acquired 8GB SD card using Win32DiskImager, I promptly assembled all the necessary cables for a test boot of the Pi. The top micro-usb cable is providing power to the Pi, while the left HDMI cable is sending the Pi's video output to an HDTV. The bottom USB cables are the keyboard and mouse, while the bottom-left yellow cable is providing a network connection to the Pi.


This first boot of "Wheezy" opened the raspi-config utility from the terminal, and from there I was able to set Pi to boot to the Raspbian desktop by default. After choosing this option the Pi rebooted itself, and then I was greeted with this lovely desktop:


I'm looking forward to testing through the lapdock instead of my HDTV, as well as starting work on the voice-control portion of this project, which will be utilizing pocketsphinx and custom python code for controlling the Pi with voice commands.

Tuesday, May 7, 2013

Welcome!

Hello and welcome to my blog! Over the next 8 weeks I will be creating a Raspberry Pi powered, voice controlled media player for my 2007 Ford Fusion. I will be using the Motorola Lapdock 100 as an HD display for the Pi, and audio will be played through the line in of my factory stereo. Voice control will be implemented using Pocket Sphinx. Stay tuned!